利用git上传本地项目到github
1 | 利用git上传本地项目到github |
1.绑定用户
1 | $ git config --global user.name "OopsAaron" # 注册github时的name |
2.生成密钥SSH key
1 | ssh-keygen -t rsa -C "1574468139@qq.com" |
此时,在根目录的.ssh文件中会生成公钥和密钥文件
打开github,在头像下面点击settings,再点击SSH and GPG keys,新建一个SSH,名字随便。
git bash中输入
1 | cat ~/.ssh/id_rsa.pub # 复制.ssh里的公钥文件到github中 |
将输出的内容复制到框中,点击确定保存。即建立了ssh连接
github上新建一个仓库后,在本地进行初始化本地仓库以及上传文件
1 | git init #初始化仓库 |
在本地写md文件以及修改,然后进行提交到github, 并更新到网站上。
3.提交到github
提交到 github 中的myBlog文件夹中
将现有的项目添加并上传 (在所在目录下右键git bash)
1 | git add . #添加当前文件夹下的所有文件 |
刷新github,即可看到上传的文件
1 | git clone https://github.com/raymond-zhao/cat-mall.git ../Github/cat-mall |
注
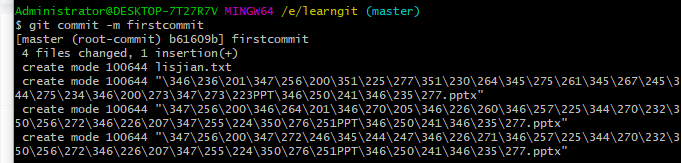
在git commit -m "first commit"中,若名称first commit不加引号,则不能有空格
如下则会报错

不知道原因,我用git status 排查了一下,发现已经添加到暂存区了,所以应该是commit的原因
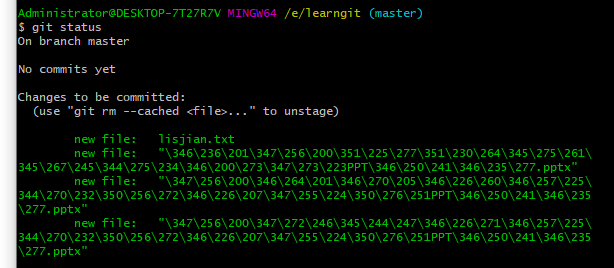
可以看到,changes to be committed ,说明都在暂存区,等待提交commit
将空格去掉,或者加上双引号即可成功
之后就可以push到远程仓库中了
参考
常用git命令清单-阮一峰 读懂diff-阮一峰 git教程-廖雪峰 git教程-菜鸟教程 gitbook Git Community Book
从只会git add .的菜鸟到掌握git基本功能
hexo更新到网站
提交到github中的OopsAaron文件中托管,并更新到网站
在本地编写完md文件,所在目录下右键git bash
1 | hexo new new_article # 新建md文件 |
1 | e.g. |

一般命令
1 | hexo clean # |
组合命令
1 | hexo s -g # 生成静态网页并本地预览 |
hexo高级操作
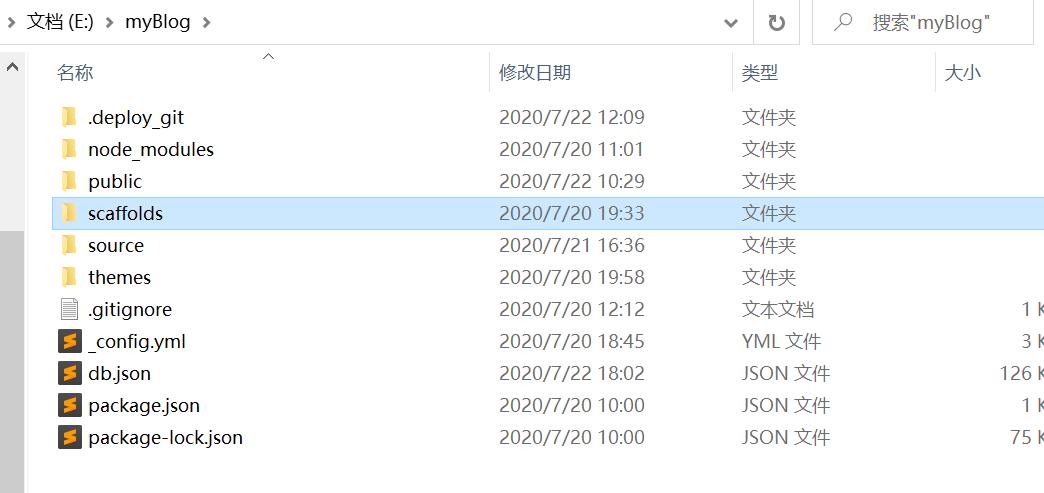
hexo的根目录结构如下所示
_config.yml
网站配置信息,也就是本文所称的站点配置文件,可以在此配置大部分的参数。
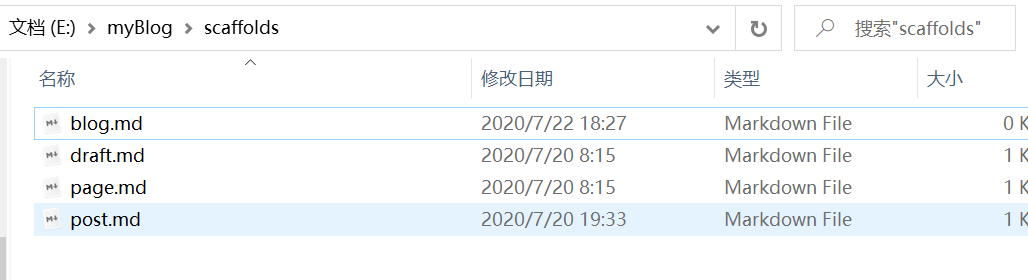
scaffolds
模版文件夹。新建文章时,Hexo 会根据 scaffold 来建立文件。
Hexo的模板是指新建的markdown文件中默认填充的内容。例如,在使用hexo new 文章名时,默认生成的md文件会包含如下内容:
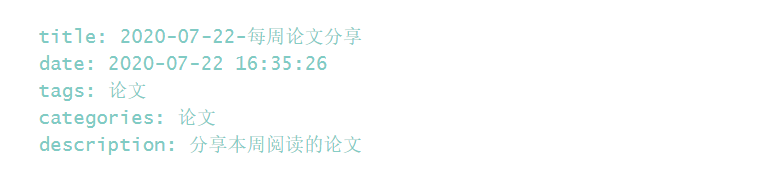
默认内容就在scaffold/post.md中保存
假如对每篇博客我都需要添加分类categories,每次都手动添加太麻烦,我希望每次默认生成都有categories:,那么就可以在scaffold/post.md中添加categories
保存后,每次新建一篇文章时都会包含post.md中的内容。
当然,你也可以在scaffolds文件夹下创建自己的博客模板,我创建一个名为blog的模板:
通过如下命令调用我创建的blog模板新建文章,在_posts中生成md文件,并且是以blog.md为模板的
1 | hexo new blog 2020-07-22-测试blog |
public
该文件夹中的内容将被最终push到github仓库中。
source
资源文件夹是存放用户资源的地方。除_posts 文件夹之外,开头命名为 _ (下划线)的文件 / 文件夹和隐藏的文件将会被忽略。Markdown 和 HTML 文件会被解析并放到 public 文件夹,而其他文件(如刚刚生成的about文件夹)会被拷贝到 public 文件夹。
为github仓库添加readme
既然 source 文件夹中的内容将全部被推送到 public 文件夹,public 文件夹中的内容又将被最终push到github仓库中,那么如果我们想要为github仓库添加readme.md,只要在 source 文件夹中创建就好了:
部署到github,就有readme了,但我们发现,README.md已经被解析为README.html,显示的全是html代码,并不是我们想要的文档格式的内容
为了解决这个问题,我们回到source文件夹,将README.md重命名为README.MDOWN,再部署到github即可
source文件夹中,.md会被解析为html,并放到 public 文件夹被push到github,但.MDWN不会被解析。
themes
主题文件夹,下载的主题都保存在此文件夹下。Hexo 会根据主题来生成静态页面。
参考
Hexo+Github博客搭建: https://zhuanlan.zhihu.com/p/35668237 git上传文件: https://blog.csdn.net/sinat_20177327/article/details/76062030 git版本管理工具详细教程: https://www.cnblogs.com/cuixiaoying/p/11821797.html