0%

2020-09-11-gpu实验加速

前言

将深度学习应用到实际问题中,一个非常大的问题在于训练深度学习模型需要的计算量太大。为了加速训练过程,本文将介绍如何如何在TensorFlow中使用单个GPU进行计算加速

简介

CUDA

CUDA(Compute Unified Device Architecture,点击进入安装网站),是显卡厂商NVIDIA推出的运算平台。 CUDA™是一种由NVIDIA推出的通用并行计算架构,该架构使GPU能够解决复杂的计算问题。安装GPU版tensorflow,必须有这个环境。

CUDA是NVIDIA推出的用于自家GPU的并行计算框架,也就是说CUDA只能在NVIDIA的GPU上运行,而且只有当要解决的计算问题是可以大量并行计算的时候才能发挥CUDA的作用。

cuDNN

NVIDIA cuDNN是用于深度神经网络的GPU加速库。它强调性能、易用性和低内存开销。

安装

必须要安装对应版本的CUDA、cuDNN和tensorflow

我在实验室服务器R740上的安装版本如下,是可以运行的

CUDA: V10.1 # nvcc --version

cuDNN:V7

tensorflow-gpu:1.14.0

1
2
3
4
5
conda install python==3.6.10  #这样可以 ,但是为什么 python==3.6.1 和  python==3.6.0 是不可以的呢??
pip install tensorflow-gpu==1.14.0 #安装成功gpu版本
#用conda装tensorflow时候,会自动下载cuda和cudnn,所以推荐用pip安装

pip install tensorflow-gpu==1.2 #如果安装错误,可以用pip卸载,没测试过。 或者直接再新建一个虚拟环境也可以

测试tensorflow-gpu

测试安装的tensorflow是否可用GPU,测试如下:

1
2
3
4
pyhton #进入python操作环境

import tensorflow as tf
sess = tf.Session(config=tf.ConfigProto(log_device_placement=True))

显示如下则表示tensorflow支持的,输出如下:

1
2
3
4
5
6
7
8
9
10
11
12
13
14
15
16
17
18
19
20
21
22
23
24
25
26
27
28
29
30
31
32
33
34
35
36
37
38
39
40
41
42
43
44
45
46
47
48
2020-09-11 08:30:54.735834: Your CPU supports instructions that this TensorFlow binary was not compiled to use: AVX2 AVX512F FMA
2020-09-11 08:30:54.821023: Successfully opened dynamic library libcuda.so.1
2020-09-11 08:30:55.698894: XLA service 0x5654b4f86600 executing computations on platform CUDA. Devices:
2020-09-11 08:30:55.699000: StreamExecutor device (0): Tesla M60, Compute Capability 5.2
2020-09-11 08:30:55.699022: StreamExecutor device (1): Tesla M60, Compute Capability 5.2
2020-09-11 08:30:55.699042: StreamExecutor device (2): Tesla M60, Compute Capability 5.2
2020-09-11 08:30:55.699062: StreamExecutor device (3): Tesla M60, Compute Capability 5.2
2020-09-11 08:30:55.732911: CPU Frequency: 2100000000 Hz
2020-09-11 08:30:55.738953: I tensorflow/compiler/xla/service/service.cc:168] XLA service 0x5654b54aa810 executing computations on platform Host. Devices:
2020-09-11 08:30:55.739001: I tensorflow/compiler/xla/service/service.cc:175] StreamExecutor device (0): <undefined>, <undefined>
2020-09-11 08:30:55.741878: I tensorflow/core/common_runtime/gpu/gpu_device.cc:1640] Found device 0 with properties:
name: Tesla M60 major: 5 minor: 2 memoryClockRate(GHz): 1.1775
pciBusID: 0000:b1:00.0
2020-09-11 08:30:55.742665: I tensorflow/core/common_runtime/gpu/gpu_device.cc:1640] Found device 1 with properties:
name: Tesla M60 major: 5 minor: 2 memoryClockRate(GHz): 1.1775
pciBusID: 0000:b2:00.0
2020-09-11 08:30:55.743420: I tensorflow/core/common_runtime/gpu/gpu_device.cc:1640] Found device 2 with properties:
name: Tesla M60 major: 5 minor: 2 memoryClockRate(GHz): 1.1775
pciBusID: 0000:da:00.0
2020-09-11 08:30:55.744263: I tensorflow/core/common_runtime/gpu/gpu_device.cc:1640] Found device 3 with properties:
name: Tesla M60 major: 5 minor: 2 memoryClockRate(GHz): 1.1775
pciBusID: 0000:db:00.0
2020-09-11 08:30:55.744692: I tensorflow/stream_executor/platform/default/dso_loader.cc:53] Could not dlopen library 'libcudart.so.10.0'; dlerror: libcudart.so.10.0: cannot open shared object file: No such file or directory; LD_LIBRARY_PATH: /home/dell2/.mujoco/mjpro150/bin:/usr/local/cuda-10.1/lib64:
2020-09-11 08:30:55.744798: I tensorflow/stream_executor/platform/default/dso_loader.cc:53] Could not dlopen library 'libcublas.so.10.0'; dlerror: libcublas.so.10.0: cannot open shared object file: No such file or directory; LD_LIBRARY_PATH: /home/dell2/.mujoco/mjpro150/bin:/usr/local/cuda-10.1/lib64:
2020-09-11 08:30:55.744891: I tensorflow/stream_executor/platform/default/dso_loader.cc:53] Could not dlopen library 'libcufft.so.10.0'; dlerror: libcufft.so.10.0: cannot open shared object file: No such file or directory; LD_LIBRARY_PATH: /home/dell2/.mujoco/mjpro150/bin:/usr/local/cuda-10.1/lib64:
2020-09-11 08:30:55.744980: I tensorflow/stream_executor/platform/default/dso_loader.cc:53] Could not dlopen library 'libcurand.so.10.0'; dlerror: libcurand.so.10.0: cannot open shared object file: No such file or directory; LD_LIBRARY_PATH: /home/dell2/.mujoco/mjpro150/bin:/usr/local/cuda-10.1/lib64:
2020-09-11 08:30:55.745070: I tensorflow/stream_executor/platform/default/dso_loader.cc:53] Could not dlopen library 'libcusolver.so.10.0'; dlerror: libcusolver.so.10.0: cannot open shared object file: No such file or directory; LD_LIBRARY_PATH: /home/dell2/.mujoco/mjpro150/bin:/usr/local/cuda-10.1/lib64:
2020-09-11 08:30:55.745166: I tensorflow/stream_executor/platform/default/dso_loader.cc:53] Could not dlopen library 'libcusparse.so.10.0'; dlerror: libcusparse.so.10.0: cannot open shared object file: No such file or directory; LD_LIBRARY_PATH: /home/dell2/.mujoco/mjpro150/bin:/usr/local/cuda-10.1/lib64:
2020-09-11 08:30:55.750141: I tensorflow/stream_executor/platform/default/dso_loader.cc:42] Successfully opened dynamic library libcudnn.so.7
2020-09-11 08:30:55.750170: W tensorflow/core/common_runtime/gpu/gpu_device.cc:1663] Cannot dlopen some GPU libraries. Skipping registering GPU devices...
2020-09-11 08:30:55.750542: I tensorflow/core/common_runtime/gpu/gpu_device.cc:1181] Device interconnect StreamExecutor with strength 1 edge matrix:
2020-09-11 08:30:55.750706: 0 1 2 3
2020-09-11 08:30:55.750797: 0: N Y Y Y
2020-09-11 08:30:55.750887: 1: Y N Y Y
2020-09-11 08:30:55.750974: 2: Y Y N Y
2020-09-11 08:30:55.751059: 3: Y Y Y N
Device mapping:
/job:localhost/replica:0/task:0/device:XLA_GPU:0 -> device: XLA_GPU device
/job:localhost/replica:0/task:0/device:XLA_GPU:1 -> device: XLA_GPU device
/job:localhost/replica:0/task:0/device:XLA_GPU:2 -> device: XLA_GPU device
/job:localhost/replica:0/task:0/device:XLA_GPU:3 -> device: XLA_GPU device
/job:localhost/replica:0/task:0/device:XLA_CPU:0 -> device: XLA_CPU device
2020-09-11 08:30:55.757190: I tensorflow/core/common_runtime/direct_session.cc:296] Device mapping:
/job:localhost/replica:0/task:0/device:XLA_GPU:0 -> device: XLA_GPU device
/job:localhost/replica:0/task:0/device:XLA_GPU:1 -> device: XLA_GPU device
/job:localhost/replica:0/task:0/device:XLA_GPU:2 -> device: XLA_GPU device
/job:localhost/replica:0/task:0/device:XLA_GPU:3 -> device: XLA_GPU device
/job:localhost/replica:0/task:0/device:XLA_CPU:0 -> device: XLA_CPU device

表示tensorflow支持device:CPU:0 ,支持device:GPU:0,1,2,3,共4块GPU

比如CPU在TensorFlow中的名称为/cpu:0。在默认情况下,即使机器有多个CPU,TensorFlow也不会区分它们,所有的CPU都使用/cpu:0作为名称。

而一台机器上不同GPU的名称是不同的,第n个GPU在TensorFlow中的名称为/gpu:n。比如第一个GPU的名称为/gpu:0,第二个GPU名称为/gpu:1,以此类推。

作者:博文视点 链接:https://www.jianshu.com/p/26ac409dfb38 来源:简书 著作权归作者所有。商业转载请联系作者获得授权,非商业转载请注明出处。

Ubuntu中查看显卡信息

1
lspci | grep -i vga #显卡

显示结果如下:

1
2
3
4
5
03:00.0 VGA compatible controller: Matrox Electronics Systems Ltd. Integrated Matrox G200eW3 Graphics Controller (rev 04)
b1:00.0 VGA compatible controller: NVIDIA Corporation GM204GL [Tesla M60] (rev a1)
b2:00.0 VGA compatible controller: NVIDIA Corporation GM204GL [Tesla M60] (rev a1)
da:00.0 VGA compatible controller: NVIDIA Corporation GM204GL [Tesla M60] (rev a1)
db:00.0 VGA compatible controller: NVIDIA Corporation GM204GL [Tesla M60] (rev a1)

Ubuntu中查看nvidia GPU

1
lspci | grep -i nvidia #查看gpu信息

显示结果如下:

1
2
3
4
b1:00.0 VGA compatible controller: NVIDIA Corporation GM204GL [Tesla M60] (rev a1)
b2:00.0 VGA compatible controller: NVIDIA Corporation GM204GL [Tesla M60] (rev a1)
da:00.0 VGA compatible controller: NVIDIA Corporation GM204GL [Tesla M60] (rev a1)
db:00.0 VGA compatible controller: NVIDIA Corporation GM204GL [Tesla M60] (rev a1)

查看Nvidia的显卡信息和使用情况

1
nvidia-smi

显示如下:

image-20200910221947824

1
ps aux | grep train.py #我的实验名称为train.py

image-20200910222011793

可以看到,我的实验进程号是21195,在processes中可以看到使用了GPU1,2

指定GPU实验加速

如果电脑有多个GPU,tensorflow默认全部使用。

如果想只使用部分GPU,可以设置CUDA_VISIBLE_DEVICES

命令行指定

在执行python程序时,可以通过:

1
CUDA_VISIBLE_DEVICES=1 python train.py #只使用GPU1

以下为一些使用指导:

1
2
3
4
5
6
7
Environment Variable Syntax      Results

CUDA_VISIBLE_DEVICES=1 Only device 1 will be seen
CUDA_VISIBLE_DEVICES=0,1 Devices 0 and 1 will be visible
CUDA_VISIBLE_DEVICES="0,1" Same as above, quotation marks are optional
CUDA_VISIBLE_DEVICES=0,2,3 Devices 0, 2, 3 will be visible; device 1 is masked
CUDA_VISIBLE_DEVICES="" No GPU will be visible1234567

代码中指定

在Python代码中添加以下内容:

1
2
import os
os.environ["CUDA_VISIBLE_DEVICES"] = "1" #只使用GPU1

设置tensorflow使用的显存大小

定量设置显存

默认tensorflow是使用GPU尽可能多的显存(内存)。

用Tensorflow创建session的时候要注意设置内存使用情况,特别是内存资源不够而且要和别人共享一块GPU的时候(留一点给别人用)

可以通过下面的方式,来设置使用的GPU显存:

1
2
gpu_options = tf.GPUOptions(per_process_gpu_memory_fraction=0.7)
sess = tf.Session(config=tf.ConfigProto(gpu_options=gpu_options))

上面分配给tensorflow的GPU显存大小为:GPU实际显存*0.7。 可以按照需要,设置不同的值,来分配显存。

按需设置显存

上面的只能设置固定的大小。如果想按需分配,可以使用allow_growth参数

1
2
3
gpu_options = tf.GPUOptions(allow_growth=True)
sess = tf.Session(config=tf.ConfigProto(gpu_options=gpu_options))
# 使用allow_growth option,刚一开始分配少量的GPU容量,然后按需慢慢的增加,由于不会释放内存,所以会导致碎片

如果一个 TensorFlow 的 operation 中兼有 CPU 和 GPU 的实现, 当这个算子被指派设备时, GPU 有优先权. 比如matmul中 CPU 和 GPU kernel 函数都存在. 那么在 cpu:0gpu:0 中, matmul operation 会被指派给 gpu:0 .

记录设备指派情况

为了获取你的 operations 和 Tensor 被指派到哪个设备上运行, 用 log_device_placement 新建一个 session, 并设置为 True.

1
2
3
4
5
6
7
8
# 新建一个 graph.
a = tf.constant([1.0, 2.0, 3.0, 4.0, 5.0, 6.0], shape=[2, 3], name='a')
b = tf.constant([1.0, 2.0, 3.0, 4.0, 5.0, 6.0], shape=[3, 2], name='b')
c = tf.matmul(a, b)
# 新建session with log_device_placement并设置为True.
sess = tf.Session(config=tf.ConfigProto(log_device_placement=True))
# 运行这个 op.
print sess.run(c)

你应该能看见以下输出:

1
2
3
4
5
6
7
8
Device mapping:
/job:localhost/replica:0/task:0/gpu:0 -> device: 0, name: Tesla K40c, pci bus
id: 0000:05:00.0
b: /job:localhost/replica:0/task:0/gpu:0
a: /job:localhost/replica:0/task:0/gpu:0
MatMul: /job:localhost/replica:0/task:0/gpu:0
[[ 22. 28.]
[ 49. 64.]]

GPU和CPU

一个GPU被多个实验使用,但是如果实验超过显存大小,就会都被挂掉,会显示stopped字样

一个实验可以用多个GPU,但是需要更改部分代码,让其支持多GPU

不要tensorflow-gpu和tensorflow(cpu版)一起装,因为这样装有个先后顺序问题,先安装tensorflow-gpu再安装tensorflow,gpu版本直接不能用了。

如果想测试cpu和gpu版本性能的,最好创建两个python的虚拟环境,一个装tensorflow-gpu,另一个装tensorflow。


在Tensorflow中使用gpu和cpu是有很大的差别的。在小数据集的情况下,cpu和gpu的性能差别不大。不过在大数据集的情况下,cpu的时间显著增加,而gpu变化并不明显。

1
2
3
4
5
6
7
8
9
10
11
12
13
14
15
16
17
18
19
20
21
22
23
24
25
26
27
28
29
30
31
32
33
34
35
36
37
38
39
40
41
42
43
44
45
46
47
48
import tensorflow as tf
import timeit
import numpy as np
import matplotlib.pyplot as plt

def cpu_run(num):
with tf.device('/cpu:0'):
cpu_a=tf.random.normal([1,num])
cpu_b=tf.random.normal([num,1])
c=tf.matmul(cpu_a,cpu_b)
return c

def gpu_run(num):
with tf.device('/gpu:0'):
gpu_a=tf.random.normal([1,num])
gpu_b=tf.random.normal([num,1])
c=tf.matmul(gpu_a,gpu_b)
return c
k=10
m=7
cpu_result=np.arange(m,dtype=np.float32)
gpu_result=np.arange(m,dtype=np.float32)
x_time=np.arange(m)
for i in range(m):
k=k*10
x_time[i]=k
cpu_str='cpu_run('+str(k)+')'
gpu_str='gpu_run('+str(k)+')'
#print(cpu_str)
cpu_time=timeit.timeit(cpu_str,'from __main__ import cpu_run',number=10)
gpu_time=timeit.timeit(gpu_str,'from __main__ import gpu_run',number=10)
# 正式计算10次,取平均时间
cpu_time=timeit.timeit(cpu_str,'from __main__ import cpu_run',number=10)
gpu_time=timeit.timeit(gpu_str,'from __main__ import gpu_run',number=10)
cpu_result[i]=cpu_time
gpu_result[i]=gpu_time

print(cpu_result)
print(gpu_result)

fig, ax = plt.subplots()
ax.set_xscale("log")
ax.set_adjustable("datalim")
ax.plot(x_time,cpu_result)
ax.plot(x_time,gpu_result)
ax.grid()
plt.draw()
plt.show()

在这里插入图片描述 
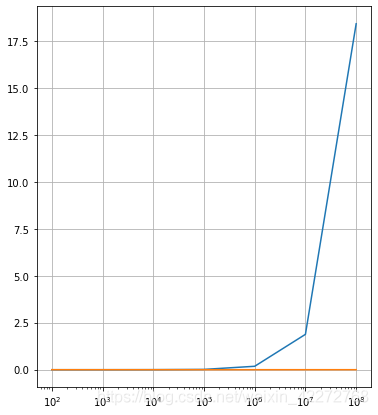
蓝线是cpu的耗时,而红线是gpu的耗时。

更多gpu内容可参考

tensorflow官方文档,使用 GPUs

Tensorflow检验GPU是否安装成功 及 使用GPU训练注意事项

TensorFlow:实战Google深度学习框架(第2版):GPU加速

tensorflow匹配的关系

image-20200913144848843

-------------本文结束感谢阅读-------------
卑微博主,在线求赏